In order for your Excel files to be imported into WIMS via the Hach WIMS Direct Server-Side Interface to Excel Data Forms the Excel files must be setup as follows.
1. Files must be Microsoft Excel 97-2003 Worksheet file (.xls) or Microsoft Excel 2007 Workbook file (.xlsx or .xlsm) files. NOTE: Excel 5.0/95 files are NOT supported.
2. The Excel cell comments must be in the form of ID: XXXXX [return]DATE: Cell Reference:

To enter a cell comment for cross referencing.
a. Right click on cell and choose Insert Comment.
b: Enter text "ID:xyz", press [Enter], enter "Date:X#" where xyz is the ID you want to cross reference to and X# is a cell reference to a cell containing a datetime.
See Tips below for how to copy just Cell Comments.
3. Your datetime cells MUST be text. Cells that contain only a date portion (no time of day) are not effected. The interface CANNOT import from date cells in Excel that contain a date and a time. You must use the Text formula to convert your datetimes to text. Example:
=TEXT(M11 +0.08339,"m/d/yyyy hh:mm am/pm")

NOTE: You can hide column M in the above form if you do not want your users to see the calculated datetime.
Tip: Copy only Cell Comments in Excel
1. Select the cells you want to copy the comments;
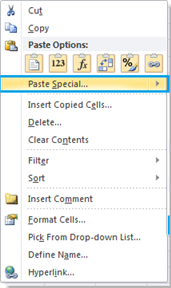
2. Right click and select Copy
3. Select a cell of the paste range, and right click to select Paste Special

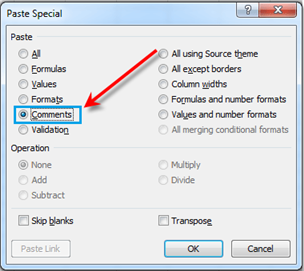
4. In the Paste Special dialog box, check Comments, and click OK. See screenshot:

And then only the comments in the selected range have been pasted into the cells.
Tip 2. Hide Cell notes
1. Open Excel Options.
- Excel 2007 – Go to the Office button and click on Excel Options in the bottom right corner of the menu.
- Excel 2010 – Click on the File tab and in the left panel, click Options.
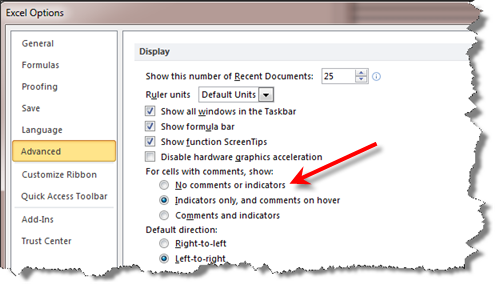
2. Click on Advanced in the left column.
3. Scroll down to the Display section.
4. Select No comments or indicators.

5. Click OK.