You will need to follow these steps in order to configure your interface :
- You must have Hach WIMS Database Management System installed and running. This can be running from anywhere on your network, but can also be running on the same computer as your interface.
- You must have Hach WIMS Client installed. Make sure you can log into Hach WIMS Database Server using Hach WIMS Client.
- Run your interface in Interactive mode by clicking on its entry in your windows Start Menu.
- Configure a connection to your Hach WIMS Server. Use Configuration - Connection to Hach WIMS to do this.
- Make sure you are properly licensed to run this interface. In Main Menu, select Support -> Am I licensed for this Interface.

If you pass this test, continue to step 6. If not, contact Hach Company Sales at 800-677-0067.
- Upload interface definition file to Hach WIMS Server. Use Utilities - Upload definition file to Hach WIMS to do this.
- You will need to assign a collector record to your interface. First the record must be created. You will need to configure Hach WIMS Client for a server side interface.
- Now you are ready to assign the collector record created in the previous step to your interface. Use Configuration - Collector Configuration to do this.
- The Configuration - Collector Configuration will provide an opportunity to configure the Collector component. Click on Collector Configuration Settings button and follow the instructions in Collector - Common Collector Configuration.
- You need to link at least one Hach WIMS variable to the chosen collector record.
- Configure the source so that interface can read from the source system.
Locate the 'Configuration -> Source Configuration' article in the 'Topics specific for operation of Interface' chapter to gain instructions on how to do it.
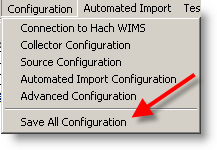
- Save all configuration Settings by clicking on Configuration -> Save All Configuration.

- You are now ready to test the interface. Use Test - Test Import All to do this
Furthermore, You may want to configure Automated Import. Use Configuration - Automated Import Configuration to do this.