The HistData to Hach WIMS utility (HISTD2HW, Q12161) communicates with WonderWare's histdata.exe DDE server and requests data files on an hourly basis. The files created from this process are need in order for the InTouch Import program to upload data. This utility must be on the same computer as the WonderWare histdata.exe program. It does not have to be on the same computer as the InTouch Import program (12097.exe).
Note: It is possible to run this program more than once! Check the system tray to ensure only one instance of the program is running.
Read this article when WonderWare resides on a different computer.
The utility resides as an icon in the system tray as this icon -  . It has three different modes:
 - Green for when the service is running, once an hour it will attempt to connect with histdata to create data files.
 - Yellow means the service has been pause in order to run the utility in manual mode.
 - Red means the service is paused.
When you right click on this icon, you will see the following options:

About HistD2HW will display information about this utility.
Restore will display a user interface for you to change configuration and settings, reset run times, manually create data files, shows the status of the utility, etc.
Minimize is enabled when the user interface is already opened and you want to close it.
Exit will terminate the utility, completely shutting down it's operations.
Main Display.
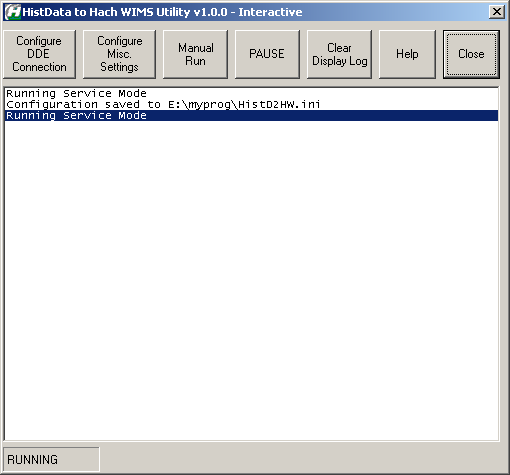
This is the main display when you click the Restore button from the icon window.
Command Buttons.

These are the command buttons available, let's go through each one.
1. Configure DDE Connection - Configuration for the DDE communications to WonderWare InTouch HISTDATA tool.
2. Configure Misc. Settings - Basic settings for the behavior of this tool.
3. Manual Run - Manual create CSV files for a given time period.
4. Pause/Run - Allows you to pause the tool from running, or Run the tool automatically.
5. Clear Display Log - Clears the display screen.
6. Help - Brings up a help screen.
7. Close - Closes the display and attempts to start the tool's automatic run.
Below is detailed information for each of these options:
1. Configure DDE Connection.
The first time this utility runs, it does not know how WonderWare was configured - so you will need to tell it where to find files. This is the first screen you will see:
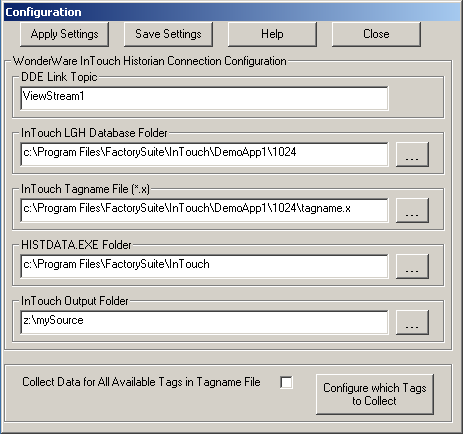
Let's look at each section, one at a time.
Configuration Command Buttons.

There are four (4) command buttons at the top of the screen.
Apply Settings -This applies the settings but does not update the configuration file. When you rerun the configuration window, all your changes will be reset back to what is in the configuration file.
Save Settings - This will apply the settings and save them to a configuration file.
Help - This will bring up this article.
Close - Closes the display, does not apply nor save settings.
DDE Link Topic.

This is the same name entered when configuring an Access Name for Hist Data:
(The following is a screen shot from WonderWare InTouch WindowMaker, select Configure -> Access Names -> either add or modify existing entry for HistData)
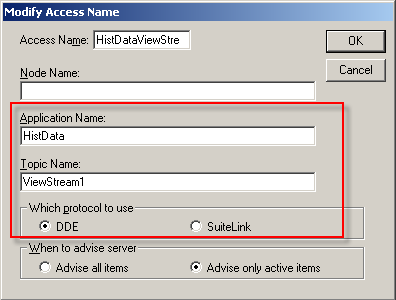
The Access Name can be anything the user decides.
The Application Name is 'HistData'. The Topic Name is whatever you want (our example shows 'ViewStream1') and you must select DDE for Which protocol to use. Notice the Topic Name in WonderWare must be the same as the Link Topic in the histd2hw configuration.
Notice in the following options, there is a box to the far right with three dots (elipse button). This enables you to browse to the folders and files you need to look for.
InTouch LGH Database Folder.

This is the folder containing the InTouch database files which have a suffix of LGH. Typically, these have the year-month-day for the filename - so a file for 3 April, 2009 would be '090403.LGH'.
InTouch Tagname File (*.x).

This is the file that contains all tagnames in the system, typically named 'tagname.x'. This file is used to determine which tags are being logged by WonderWare and the folder is required to perform DDE communication. If you do not select a file, the utility will automatically use 'tagname.x'.
HISTDATA.EXE Folder.

This is the folder where histdata.exe (DDE server program) is located. Histd2hw will restart histdata.exe if it is not already running.
InTouch Output Folder.

This is where histd2hw will move the files once histdata has created them.
Tag Collection.

This option provides users with the capability to collect all historical data or just the tags they need. Click the check box to get all historical data. Click the button Configure which Tags to Collect in order to select which tags to collect data from WonderWare. Clicking the button will bring up this display:
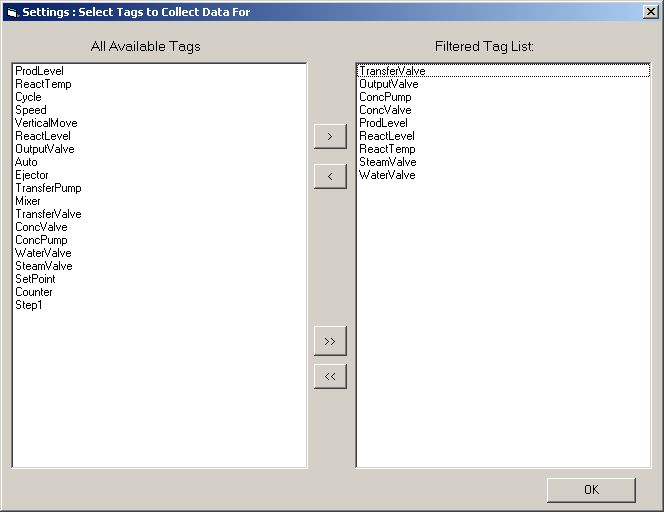
All the tags that WonderWare is collecting data for can be seen on the left hand display text box. The four buttons in the middle allow the user to move one, several, or all tags into (and out of) the display text box on the right. Whatever tags are listed in the right hand display text box will be the ones that HISTD2HW will collect data.
The single < (less than) and > (greater than) buttons will let you move one or several tags into or out of the right hand display box.
The double << (less than) and >> (greater than) buttons will either move all tags into or out of the right hand display box.
Pressing OK will update the list of tags in memory only. You must Apply and Save any changes in order for this utility to use them.
2. Configure Misc. Settings Command Button.
The purpose of the Settings command button is to set certain values for how you need histd2hw to behave. Clicking on the settings command button brings up this display:
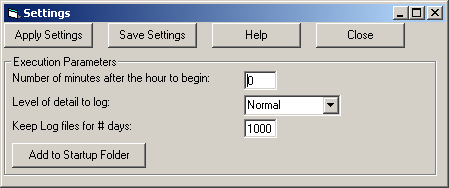
Settings Command Buttons.

These behave the same as the command buttons for Configuration (Please see section above).
Execution Parameters.

Number of minutes after the hour to begin - Enter a number between 0 and 59 (inclusive) for the time histd2hw will begin processing data files.
Level of detail to log - This is how verbose you would like to see information displayed in the main screen. The screen will automatically clear itself when it has filled up. A log file will keep a copy of information in text format.
Keep Log files for # days - This is how old the log files will be kept. Any files older than the number listed will be purged.
Add to Startup Folder

This button will add a shortcut to the Startup folder. This means that once properly configured, this utility will run automatically if the computer should reboot.
Note: If you do not do this step, and your computer reboots - you will need to remember to run this utility manually.
3. Manual Run Command Button.
Manual Run allows you to create (or recreate) data files for a specified time range. First, you are asked the start and end date and time.
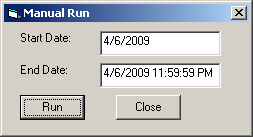
When you click the Run button, the utility will begin creating hourly files for the time span listed in the two dates. These must be "mm/dd/yyyy hh:nn" format where:
mm = Month
dd = Day
yyyy = Year
hh = Hour
nn = Minutes
Note: although you can enter minutes, the program truncates the time to the hour. In our example, the Start Date is midnight of 6 April, 2009 and the End Date is 11 PM for 6 April, 2009.
4. Pause/Run Command Button.
This command button will pause the service if it is running, or attempt to start the service if it is paused. The configuration must be completely finished before the service can run. To test the configuration, simply click the Manual Run button and attempt to create data files for one day in the past.
5. Clear Command Button.
This command simply clears the dialog screen, but does not affect the log files.
6. Help Command Button.
This will bring up the help file if it is available. This is looking for the Help.chm file packaged with the InTouch interface.
7. Close Command Button.
This will close the dialog box and start the service. If configured properly the sevice will start and the Hach icon will turn green.
NOTE: It is possible to run this application utility on a different computer. Contact Hach WIMS Support at 1-800-677-0067 for details.