The state of Minnesota has an electronic requirement for Wastewater Supplemental Daily Data. It is similar to the NPDES summary data electronic, but has a daily data as a separate submittal form.
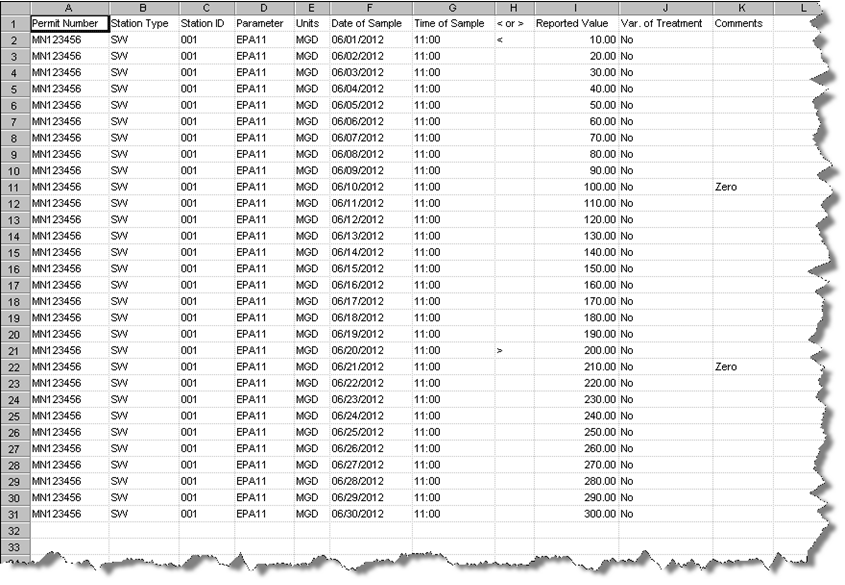
The form uses a Microsoft Excel format with 11 columns:

1. Permit Number – Each site enters its Permit Number provided by the state.
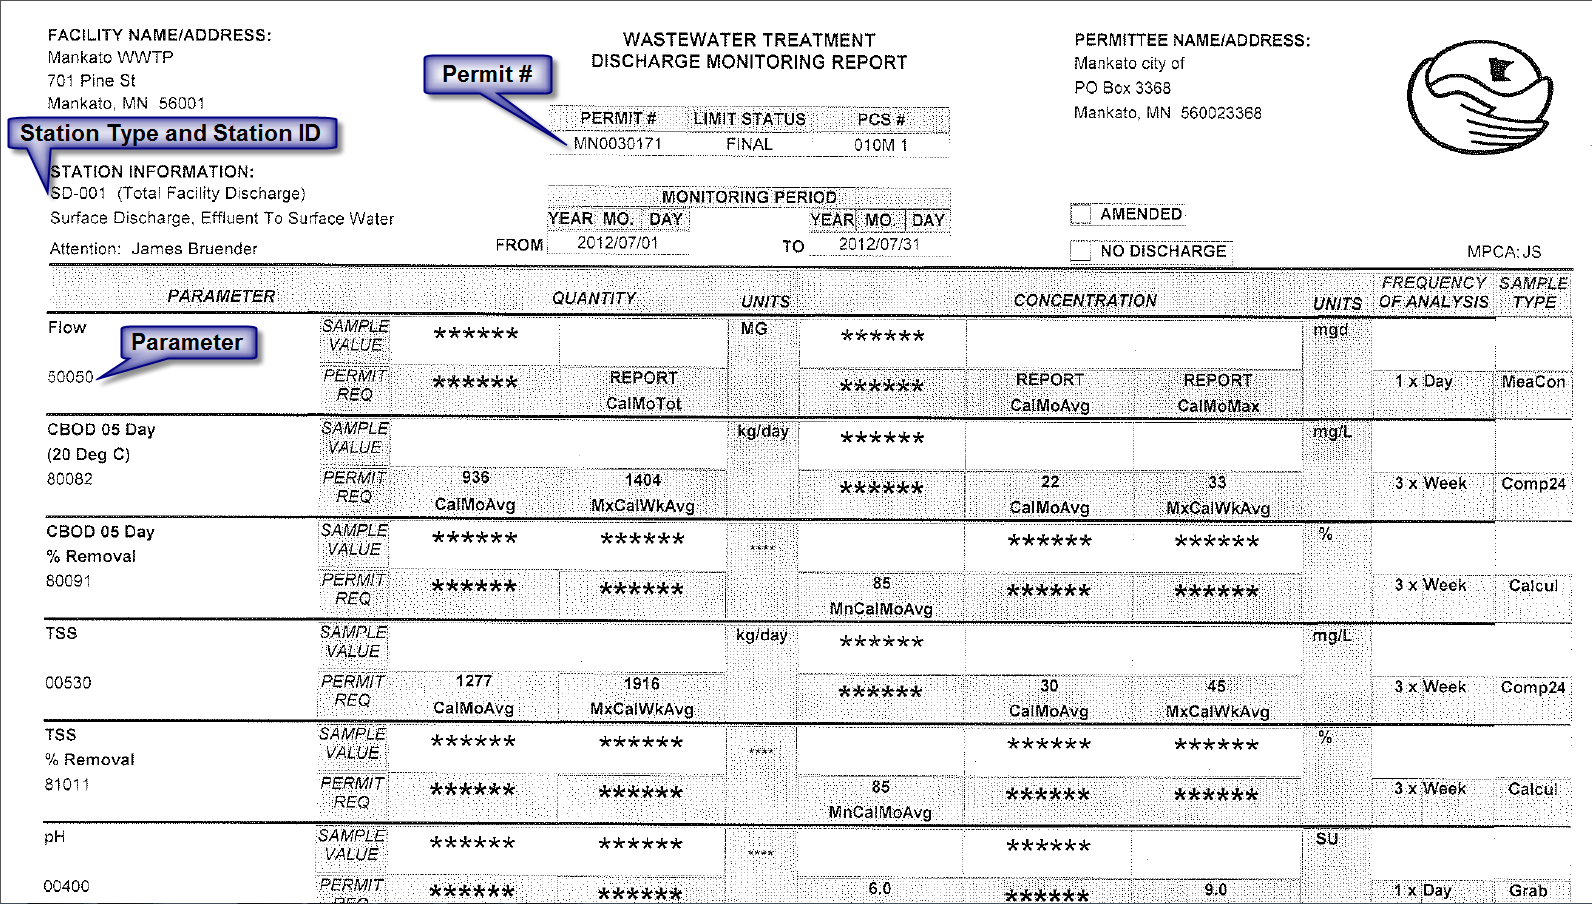
2. Station Type – A two digit letter code (e.g. GW, LA, SD, SW or WS) that defines the type of station the discharge is coming from. It is found on the preprinted DMR form received from MN State. It is always associated with a three digit station ID.
3. Station ID – Closely associated with the Station Type. Example: SD001.
4. Parameter – A five digit EPA number. The EPA parameter code is on the DMR as well.
5. Units – The Unit code must match abbreviation that is on the DMR.
6. Date of Sample – Date the sample was entered into the database.
7. Time of Sample – Regular time when sample is reported.
8. Operators (e.g. < or >) – If a value has a < or > symbol, the operator is only the symbol used. E.g. the operator for <5.00 is <.
9. Reported Value – The value reported minus any associated operators (< or >).
10. Variability of Treatment - A term for a tiered monitoring/limit condition contained in the permits for a few facilities where the monitoring requirements and/or limits are varied depending on other conditions present either in the plant (production based) or sometimes flow based. A facility will know if they have it; if they don’t, as of right now we are planning to have it left blank and it will default to ‘no’ when submitted to us. Valid values would be S for secondary and T for tertiary.
11. Comments – Result Comment associated with data entries.
There are three steps to get the XLS (Excel) report needed for electronic submittal:
I. Setup User Defined Fields.
II. Build Spread Report.
III. Export Spread Report data to XLS File.
I. SETUP USER DEFINED FIELDS
To use the Minnesota Supplemental Wastewater eDMR form, each variable will need to have user defined fields assigned for:
-
Permit Number
-
Station Type
-
Station ID
-
Parameter
-
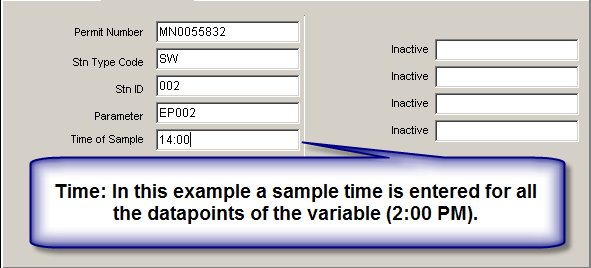
Time of Sample may also need a user defined field if there is not a constant time used by all variables.
Note: If you do not have 4 to 5 free user defined fields, contact Tech Support at 1-800-677-0067 option #2 to work out a strategy to remedy the problem.
Listed below are the steps to assign the user defined fields:
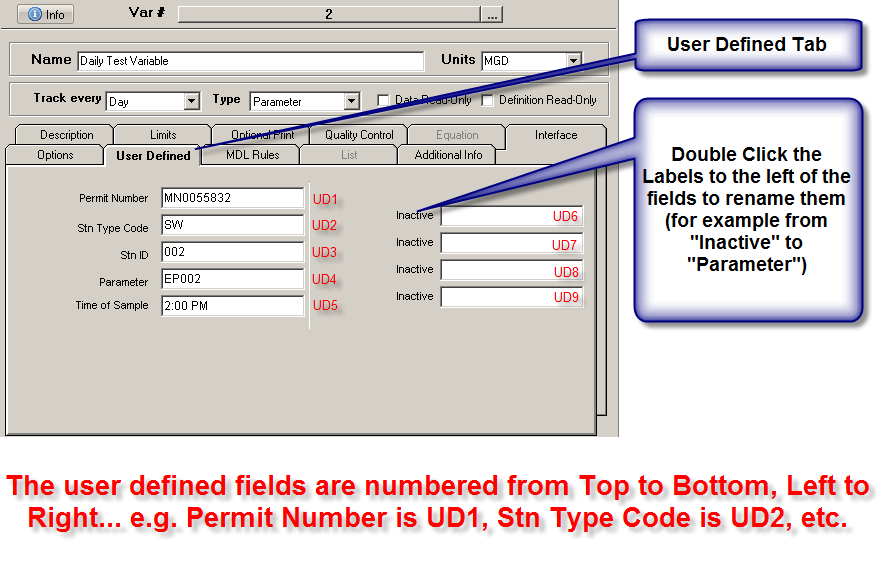
1. From WIMS dashboard, select from the top menu: System Setup, then Edit/View Variables.
2. Select the User Defined tab.
3. Double click on any “inactive” fields to rename.
4. Recommended that you use the following user defined fields (to match form defaults).
a. User Defined Field 1: Permit Number
b. User Defined Field 2: Station Type
c. User Defined Field 3: Station ID
d. User Defined Field 4: Parameter
e. User Defined Field 5: Time of Sample
5. Fill out the fields with the information appropriate to the DMR and variable.
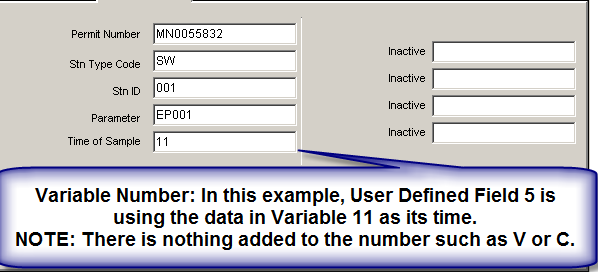
6. Time of Sample can be either a set time for each variable, or can contain a variable number. See example below.
II. BUILD SPREAD REPORT
The next step is to build and save your Spread Report.
To build a spread report take the following steps:
1. Determine Sheet Size
2. Modify Report Type in Options
3. Locate variables via Minnesota Supplemental Daily Values tool
4. Save
The steps are explained in greater detail in the following:
1. Determine Sheet Size
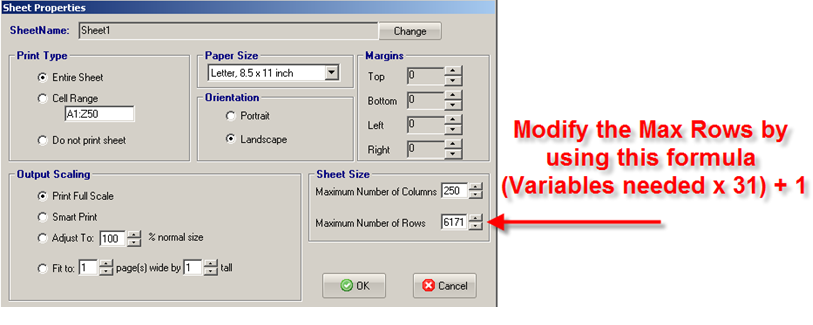
A typical Spread Report in design view has 600 rows. This means if you are reporting 19 variables or less (19 x 31 = 589) then you are fine with the default. However, if you need more, then you would need to setup a spread report that can handle an appropriate number of rows for your variables.
Note: The spread report can only handle 199 variables. It does not matter if it’s a month with 28 days or 31 days, the limit is 199. If you need to report on more variables, then you would need to create multiple spread reports to handle them all.
1. From the main dashboard in WIMS, select from the top menu Design, then Spread Reports.
2. Once opened, select from the top menu Sheets, then Properties.
3. Sheet size is on the corner, where you may select the desired number of rows (variables needed x 31) + 1.
The +1 is to allow a row for the headers.
4. Click OK to accept.
2. Modify Report Type in Options
Skipping this step could lead to numerous errors when trying to submit the final XLS to the state.
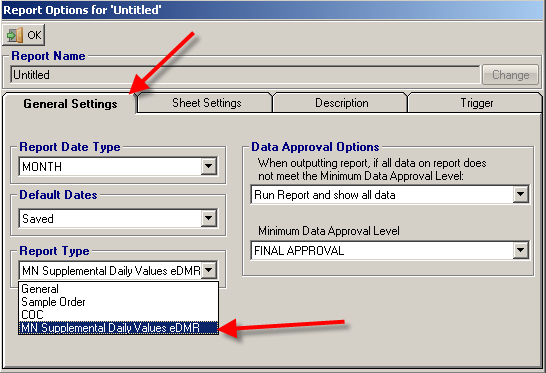
1. From the main spread report window, select File, then Report Options.
2. Select the General Settings tab
3. Change Report Type to MN Supplemental Daily Values eDMR
4. Click OK to accept
3. Locate variables via Minnesota Supplemental Daily Values tool
To import daily data into a Spread Report, a special tool has been designed to streamline the process, placing the data into correct fields.
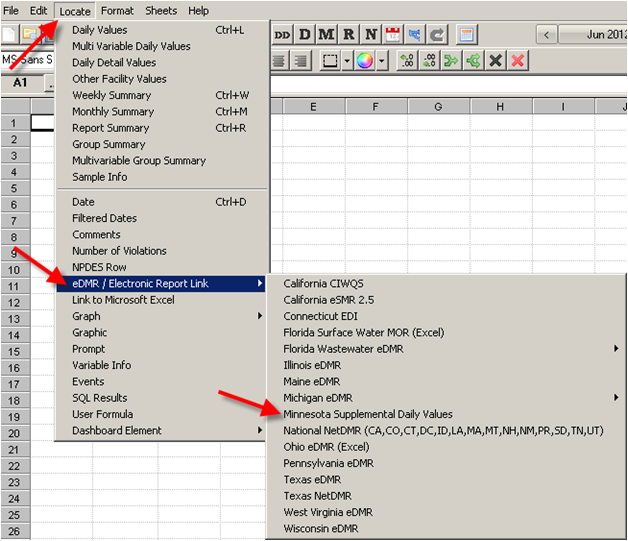
1. From the main Dashboard, select Design, then Spread Reports.
2. From the top menu, select Locate, then eDMR / Electronic Report Link, then Minnesota Supplemental Daily Values.
3. Fill out the form:
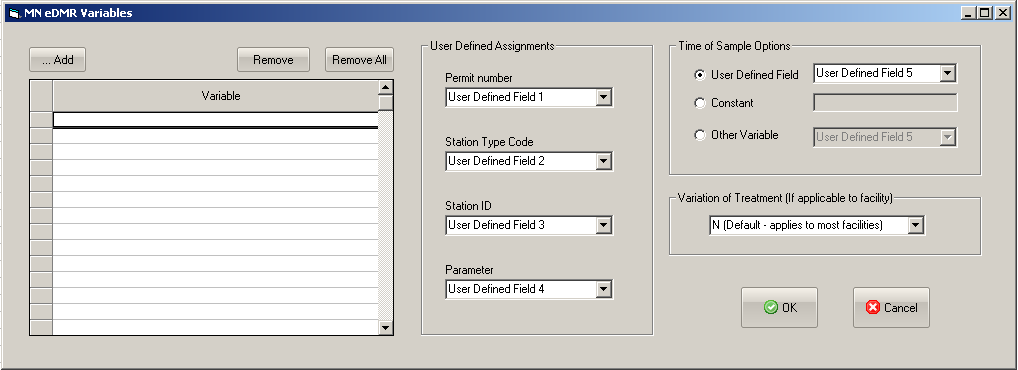
a. Click the …Add button to add variables (up to a max of 199).
b. Adjust the User Defined Fields to what was entered in the User Defined tab in Edit/View variables (see the SETUP USER DEFINED FIELDS section of this article for help)
c. Choose the Time of Sample option used.
-
User Defined field - Use this if you chose to enter a static time for each variable in the User Defined Field. Using this option will always produce the same result for each variable e.g. if 8:00 was used for variable 1, then all samples for variable 1 will report 8:00.
-
Constant - Use this if you choose to enter a static time for all variables. e.g. if you enter 8:00, then all variables will use 8:00.
-
Other Variable - If you do not always collect your data at the same time, then you may want to use another variable to record the sample time for each day. For example if variable 1 is your data variable, and variable 9002 is your sample time variable, then you would enter variable number 9002 in your user defined field (named "Time Variable" in this example) for variable 1.
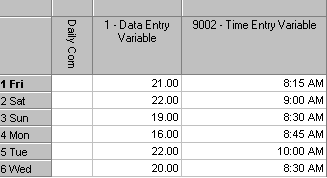
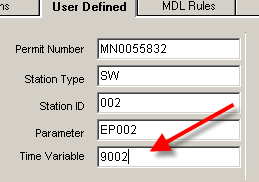
The result is shown below. Notice the Time of Sample values are pulled from variable 9002 in the above example, while the reported value is from variable 1.

d. Adjust the Variation of Treatment setting if applicable. Most facilities will use the default of N.
e. Press OK once all the settings seem correct.
Your report should look similar to the following (example shows only 1 daily variable):
4. From the main spread report select File, then Save As.
5. Enter a form name that you can easily remember, then press OK.
III. EXPORT SREAD REPORT DATA TO XLS FILE
Once the spread report has been built and saved, you are ready to export it to an XLS document that can be uploaded to the state.
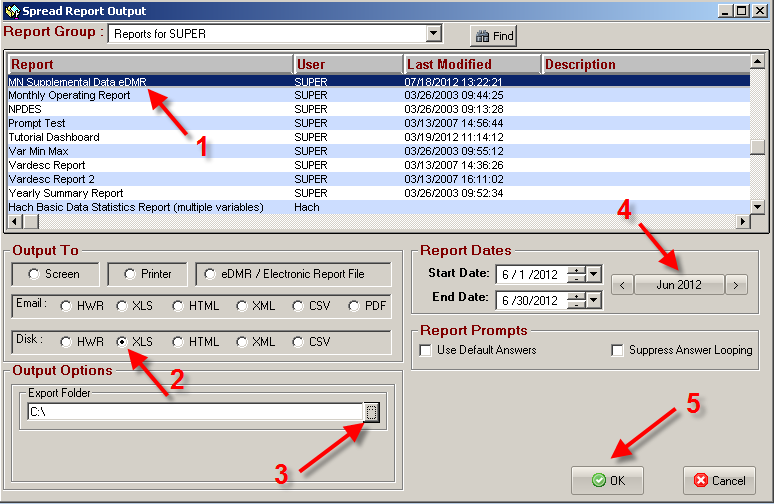
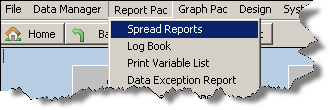
From the main Dashboard select Report Pac, then Spread Reports
1. Select your report from the list.
2. On Output To, select Disk: XLS.
3. Select your Export Folder (this is where you will find your document after the export).
4. Adjust your Report Dates.
5. Click OK.
