|
To configure your Hach WIMS Direct Server-Side Interface to Custom Q12410 LabVantage LIMS:
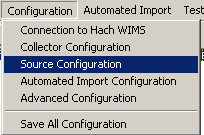
- Open Source Configuration.

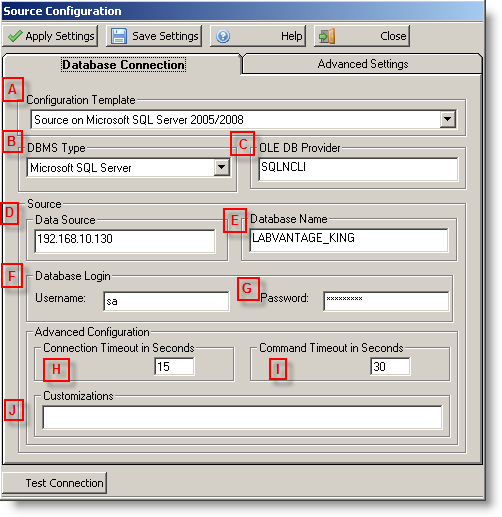
- Setup Database Connection Tab:

A - Configuration Template: The templates will set up some default values for different database connections. Choose one.
B - DBMS Type: This is used to specify the source database backend. The options are Microsoft SQL Server or Oracle. You can use this to select the default OLE DB Provider for each database backend. Choose One.
C - OLE DB Provider: This specifies the OLEDB driver to use to make the connection to the database backend. If you do not know what this is, you can use the DBMS Type to pick the typical default Provider for you by picking your database backend type. Type in the provider you would like to use if the current one is unavailable.
D - Data Source: This field specifies the location of the datasource. This is typically the computer name or IP address that houses the database. If you are running Microsoft SQL, your Data Source maybe instanced. If that is the case you may use ComputerName\InstanceName. Type in your data source.
E - Database Name: The database that houses your source data. Type in the name of the database.
F - Username: The user loggin that you wish to use for this interface's connection to the database. This is a user in the database security. This user will need read privledges on the selected database. Type in a username.
G - Password: The password that corrosponds to the username specified. Type the password.
H - Connection Timeout in Seconds: When connecting to the database, this number specifies, in seconds, how long to wait before timing out.
I - Command Timeout in Seconds: When the interface issues a command to the database, this number specifies, in seconds, how long to wait before it decides that the database connection has timed out.
J - Customizations: This section is used for adding additional fields to the constructed connection string. This field is for advanced users and is not required for a typical connection.
- Set up the Advanced Settings:

Import Hach WIMS Comments: This option allows comments to be created in the Result Comments section for a datapoint in Hach WIMS. This is useful for situations where certain values could not be parsed. It is recommended to leave this On.
Source Table: is the source table to retrieve data from.
Source Table Owner: is the owner of the source.
NT Service mode write 'Y' to PROCESSED field: If checked, when the interface runs as an NT service, it will write a 'Y' to the PROCESSED field in the source table (u_transfer in the picture above) to all data points since the last time the service ran. The data point will be ignored on subsequent runs unless the box is checked for Reprocess all data points for given date range.
Interactive mode write 'Y' to PROCESSED field: If checked, when the interface runs interactively, it will write a 'Y' to the PROCESSED field in the source table (u_transfer in the picture above) to all data points in the specified date range. The data point will be ignored on subsequent runs unless the box is checked for Reprocess all data poitns for given date range.
Reporcess ALL data points for a given date range: This option will enable/disable the ability to retrieve all data within a given date range. If disabled, the interface retrieves all data points that have no value in PROCESSED field.
Approval Levels: Match the STATUS values in the source data (RAW, FINAL) to the approval level value in Hach WIMS (-1024, -512, etc.)
Table has U_SAMPLETYPE: uses this field if enabled, ignores the field (i.e. when not present) if disabled.
- Return to the Database Connection tab and press the Test Connection Button.

- Save Settings and Close.

|