This is the source configuration screen for the Hach WIMS Direct Server-Side Interface to Generic LIMS CSV Files. First of all, we need to ensure the data files can be read by this interface.
Assumptions and Constraints:
- The source data files must be a Comma Separated Value (CSV) or Tab Separated Value files.
- All files located in the Import Folder will be processed.
- All files in the Import Folder must have the same configuration that is explained in this article.
- This tool will only process a total of 32,000 lines of data included in all files of the Import Folder.
NOTE: The interface will only process up to 32,000 lines per session. It will process files until it reaches 32,000 lines and stop. It will not process the file it stops on. A file containing more than 32,000 lines will need to be broken down into multiple files with less than 32,000 lines in each file.
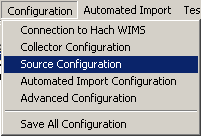
In order to configure source connection from the interface, click Configuration and select Source Configuration.
The next screen will display control buttons and parameters that need to be filled in. Notice there are two tabs - one for Source File Configuration and one for Column Mapping. Source File Configuration needs to accomplished before Column Mapping if a file is available. The automation included with Column Mapping will require a sample data file, comma delimited.
Source Configuration:
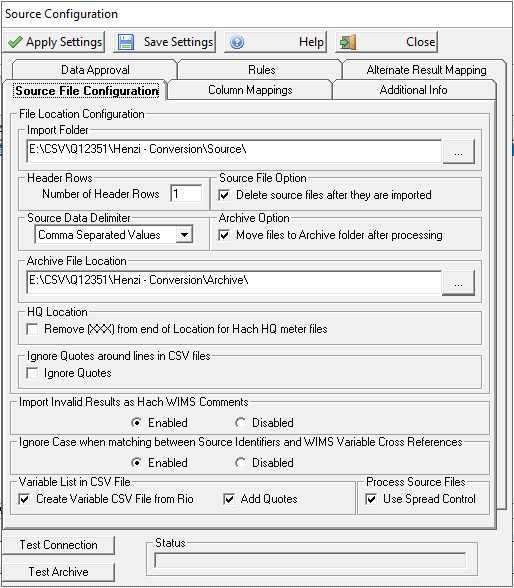
Control buttons for both tabs are:

- Apply Settings - this will apply the settings to the program temporarily
- Save Settings - this will save the settings for subsequent runs
- Help - brings up the help documentation
- Close - closes the source configuration screen
Parameters for Source File Configuration:
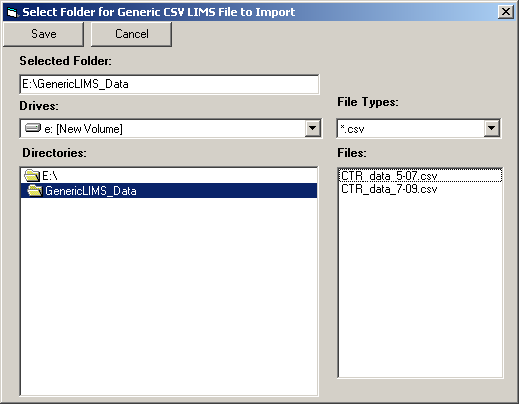
- IMPORT FOLDER - specifies the folder (location) of the generic LIMS CSV files to be imported. The interface will attempt to import all the csv files contained in this folder when you run it. Click the elipse button
 to bring up the file browser:
- Header Rows - Set the number of header rows in the file.
- Source File Option - this option determines what to do with source files after they have been imported. If checked, the interface will delete the source file after the data has been imported. If there are many files that total more than 32,000 lines all together, checking this box will enable the ability to process what the interface allows (maximum of 32,000 lines) and remove from source folder. Then rerun the interface to get the next batch of files. A single file with more than 32,000 lines will not be processed, break the file out into several smaller files.
- Archive Option - This option determines if the source files are archived after they have been imported. If checked, source files will be copied to the Archive Folder which is located under the interface exe folder. For example, if the interface is installed in C:\HachWIMS\Client\utility\Q12351 the files will copied to C:\HachWIMS\Client\utility\Q12351\archive.
- Archive File Location - This options let you set a directory to archive the csv files after processing. Follow the instructions for the Import Folder for setting this. If no directory is set, Archiving the csv files will work as described in the Archive Option above.
- Source Data Delimiter - Specify whether data in the source files are comma separated or tab.
- Remove (XXX) from end of Location for Hach HQ meter files - Removes the trailing "(XXX)" from the SampleID (Location) column. Should only be used when importing CSV data from Hach HQd portable and benchtop meters (HQ40d, HQ30d, HQ14d and HQ11d portable models, as well as the HQ440d, HQ430d and HQ411d benchtop models). The SampleID field, which is used as the location, has a three digit number in parentheses appened to it when output. Checking this box will remove the "(XXX)" from the field so it can be matched to a WIMS variable. For example, the Sample ID on the HQ meter is entered by the user as "RAW EC". The CSV file would contain RAW EC (001) for the first sample and RAW EC (002) for the second. Checking this box would remove the (001) from the SampleID before comparing it to the WIMS Variable's Interface Location setting.
- Ignore Quotes around lines in CSV Files - If the lines in the CSV import file have quote at the beginning and End of each line, remove them before processing the line.
-
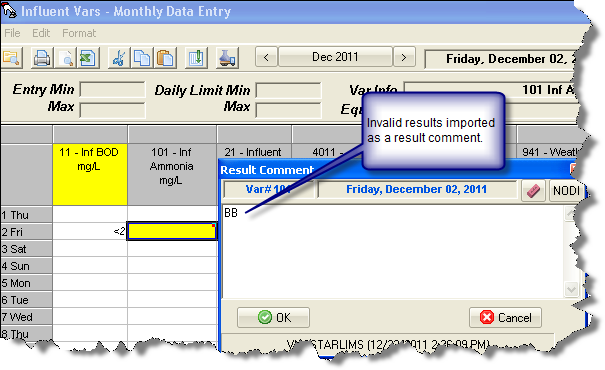
Import Invalid Results as Hach WIMS Comments - When importing a result if the result is not a valid value for WIMS, import the result as a result comment. For example, the Result in the CSV is BB (for broken sample bottle) which is not a value that can be entered into WIMS (i.e. BB is not a symbol) the BB is imported as a Result Comment and the value in WIMS is left blank. NOTE: If you map a column to a result comment and you get an invalid result, the interface will import the Invalid Result semicolon and the result comment from the column. Example: "BB; Sample was green" where BB is the result and "Sample was green" was in the result comment column. If there is an existing result comment it will be overwritten.
-
Ignore Case when matching between Source Identifiers and WIMS Variable Cross References - enable this
setting when you need to ignore case during matching to WIMS variable cross references.
-
Variable List in CSV File - enable this to have a Variable Input CSV File generated from Rio Parameters with Data Sources set to Lab.
-
Add Quotes - Enclose each field in Variable CSV File generated from Rio in double quotes. This will allow commas in the data.
-
Use Spread Control - Checking this will use the Spread Control for processing Input CSV Files. This will handle various issues with quotes, commas etc. in CSV Input File.
Column Mapping
Note: The first time you click on the Column Mappings tab, source configuration will attempt to open the first data file in the Import Folder. This will load some data into memory so that when you click the elipse button  , the program does not have to reload a sample of the data each time. When you change the Import Folder location, the program will have to reload sample data.
If there is no file, then the elipse buttons  cannot be used. The following error message will be displayed.
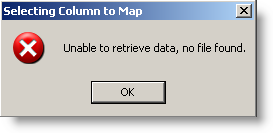
Simply enter the column mapping by hand and save settings. It is a good idea to recheck the column mapping settings when a source data file is available in the Import Folder. The following display shows the Column Mappings screen and each column setting is explained below.
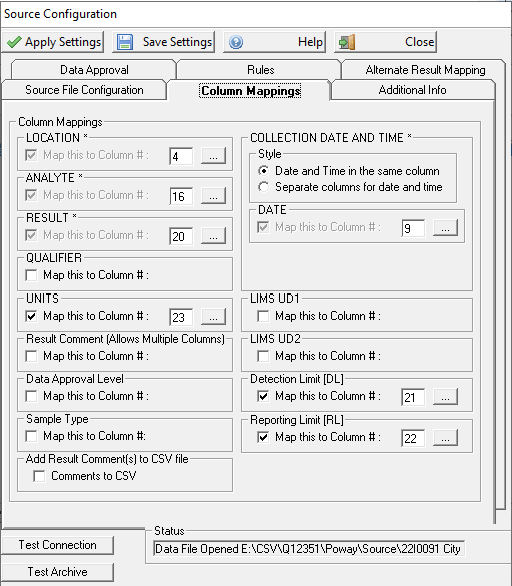
Column mapping:
In order to complete this section, a LIMS CSV File should be available. Click the elipse button (  ) to view source data. This option is explained in Select Column for Mapping
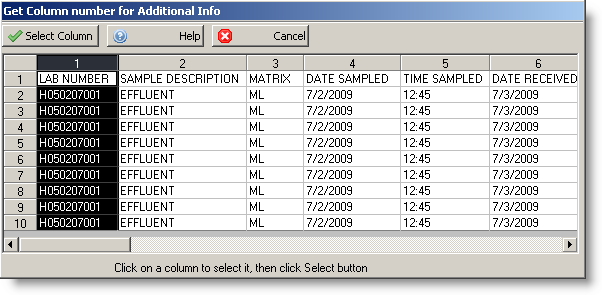
You can also open the file, preferably in Microsoft Excel or some other spreadsheet program, to view the data. The values must be numeric starting with 1 for the first column, 2 for the second and so forth. We will use the following as an example of input data:

Parameters for Column Mapping are:
LOCATION - This parameter is the location that uniquely identifies our analyte, we determine that SAMPLE DESCRIPTION suits our purpose for LOCATION, so we enter 2 (two) in the box since it is the second column
ANALYTE - This parameter is the test or analyte performed, the Analyte Name column will be used as our ANALYTE NAME, so we enter 7 (seven)
RESULT - This parameter is the column that containts the results from the test, the column containing the results in our example is RESULT column, shown as column H which is the eight column, so we enter 8 (eight)
QUALIFIER - This parameter, if used, identifies what column contains the qualifier of the data. In our case, we store the qualifier in a column labelled FLAG which is column K so we enter 11 (eleven)
UNITS - This parameter, if used, identifies what column contains the units of the data. In our example this is column J so we enter a 10 (ten)
RESULT COMMENT - Optional, Defines column(s) to import as a Result Comment. Multiple columns can be selected.
STYLE - This parameter defines whether the date and time are in one field or two. When Date and Time in the same column is checked, only the Date column needs to be supplied. If these are in two seperate columns, as in our example, then we enter the column number for date and the column number for time.
DATE - This parameter is to specify the column for the date or date and time depending on how the previous parameter was answered. In our example the date is in column D so we enter a 4 (four).
TIME - Since we have two seperate columns for date and time, we have to specify the time column, which is E, so we enter a 5 (five)
LIMS UD1 - If it is required to cross reference to variables based on an additional field, you will need to map the LIMS UD1 field. For example, the csv file contains routine and non-routine results which is held in a SampleType field. In WIMS variable setup if you only want Routine results we would use the LIMS UD1 field on the Edit View Variables Interface Tab. NOTE: If you map this field YOU MUST cross reference all three fields, leaving the LIMS UD1 field blank in Variable Setup will not match to any source records if this field is mapped.
LIMS UD2 - If it is required to cross reference to variables based on an additional field, you will need to map the LIMS UD2 field. Similar use as the LIMS UD1 field.
ADD RESULT COMMENT(S) TO CSV FILES - If importing data to CSV File instead of WIMS, Result comment will be added to CSV File.
Example:
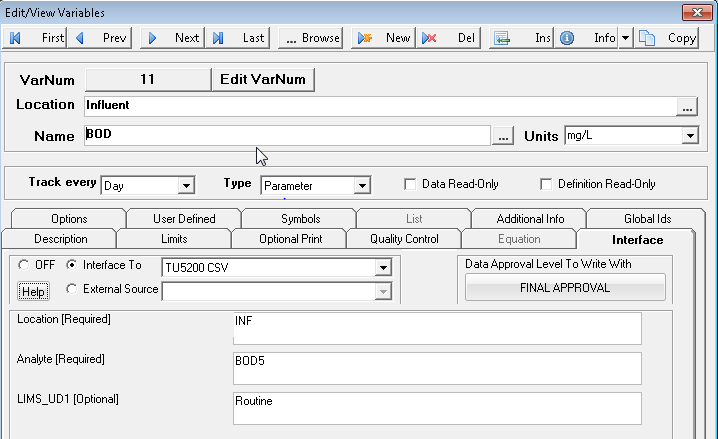
Data Approval Level - Sets the column that contains the Data Approval Information. If this field is not mapped, the interface will write data based on the "Data Approval Level to Write With" setting for the variable (in WIMS on the Interface Tab in Variable Edit/View Variables). If it is mapped, you will need to fill out the Source Values to WIMS Data Approval Level table on the Data Approval Tab (describe below).
DETECTION LIMIT - This defines a column for the detection limit. This field can be used for some new Rules capabilities. See the Rules section at the bottom of this document.
REPORTING LIMIT - This defines a field for the reporting limit. This field can be used for some new Rules capabilities. See Rules section at the bottom of this document.
SAMPLE TYPE - This defines a column for the Sample Type. This field can be used for some new Rules capabilities. See the Rules section at the bottom of this document.
Additional Info fields:
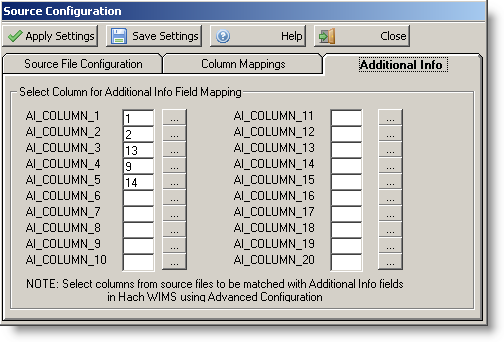
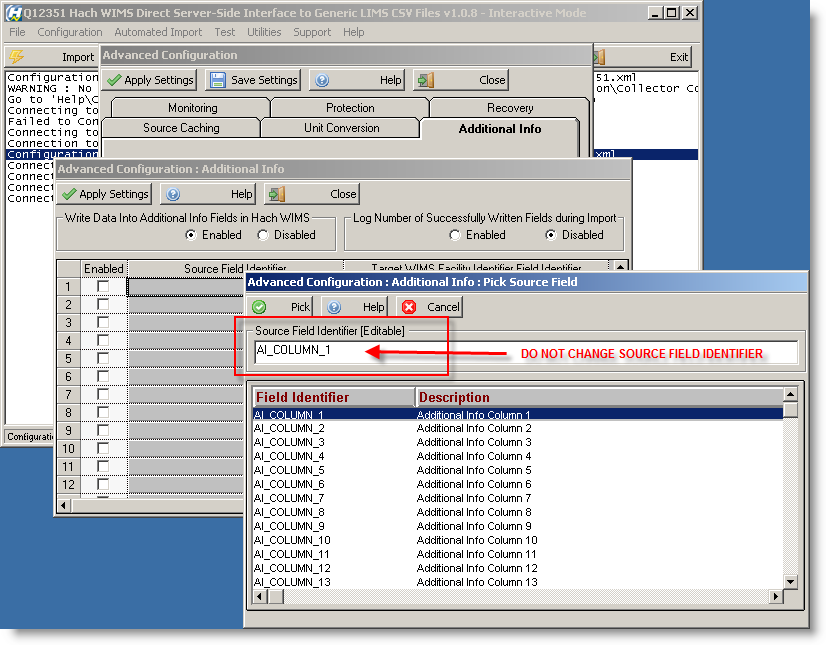
NOTE: In Configuration > Advanced Configuration > Additional Info tab > Configure Additional Info DO NOT CHANGE SOURCE FIELD IDENTIFIER as shown above
This is where you identify the columns of the source file (CSV) to pair up with fields created in the Hach WIMS Data Additional Info for your facility. You map a column in the source data to AI_COLUMN_1 to start with and go down the list. Notice we do not have to have the column numbers in any specific order. When finished selecting columns and creating Data Additional Info fields for your facility in Hach WIMS, then go to Configuration -> Advanced Configuration and select the Additional Info tab to complete the mapping process - there you will select AI_COLUMN_1 to map to a specific field you created in Hach WIMS.
Data Approval:
The interface can set the data approval level based on a column in the CSV files. For example, the CSV file has a column called Confirmed that can contain values Y, N, and Maybe. WIMS is setup with two data approval levels - Final Approval and Entered.

First you must set the Data Approval Level column on the Column Mappings tab. Using the Data Approval Tab you can then specify which Source Values (Y,N, Maybe) correspond to which Data Approval Level. In this case Y corresponds to Final Approval (value of 0) and N, Maybe correspond to Entered (-1024). YOU MUST SPECIFY THE NUMERIC VALUE FOR THE DATA APPROVAL LEVEL NOT THE DESCRIPTION:
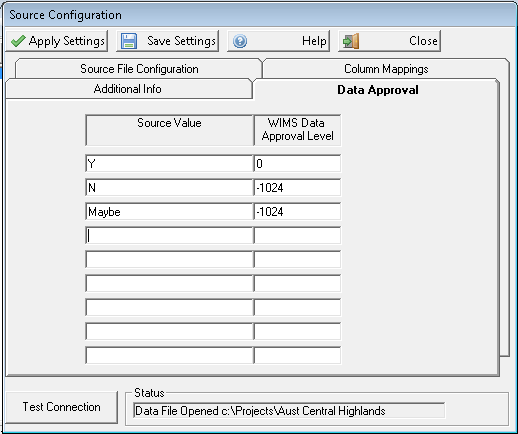
Data Approval Level - Sets the column that contains the Data Approval Information. If this field is not mapped, the interface will write data based on the "Data Approval Level to Write With" setting for the variable (in WIMS on the Interface Tab in Variable Edit/View Variables). If it is mapped, you will need to fill out the Source Values to WIMS Data Approval Level table on the Data Approval Tab.
Alternate Result Mapping
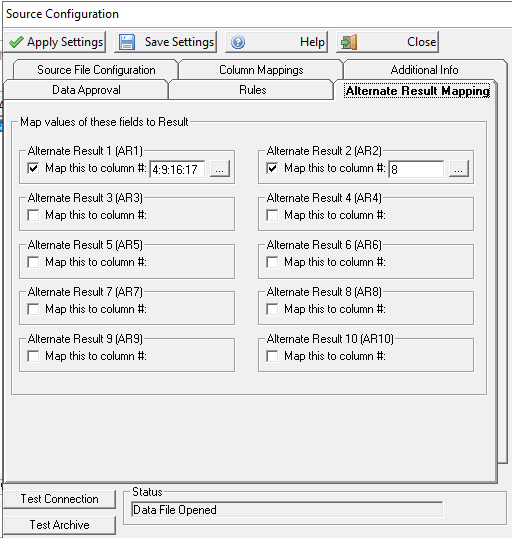
This feature allows other data from the CSV file to be brought in as the Result. The intent of this feature is for pulling data into Rio. Up to ten Alternate Results can be defined. For each Alternate Results field, multiple columns can be set. When selecting the fields, fields can be appended or overwritten. If appended, the column mapping field will contain the appended fields separated by a :.
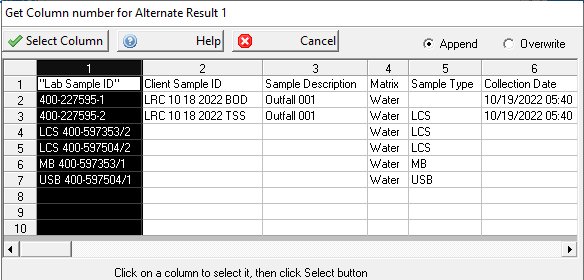
For each of the Alternate Result Mapping fields that are set, a new record will be created with the result containing the values of the defined fields separated by '::'. Example ND::RL::MDL
The Analyte field will be set like set like: BOD5::AR1. A variable or variables will need to be set up to cross reference the Alternate Result data.
RULES
Rules are used to fix results/qualifiers that are in a different format from WIMS. Typically, it is used to replace results to match what WIMS needs. Examples:
- The CSV contains a 0 (zero) for E COLI results, WIMS has a text variable that expects an "A" (Absent). The first rule will convert the zero(s) to A for Analytes equal to E COLI.
- The third rule handles values from the lab such AA 0.45 which means <0.45. Notice also the space between the AA and 0.45. To specify a leading or trailing space use <sp>. So AA 0.45 will be imported as <0.45.
When specifying, the value "Anything" means all records will be looked at. If you need to also replace zero's with A for Total Coliform, you would need to add the rule for Total Coliform as you would not want to change all zeros to A.
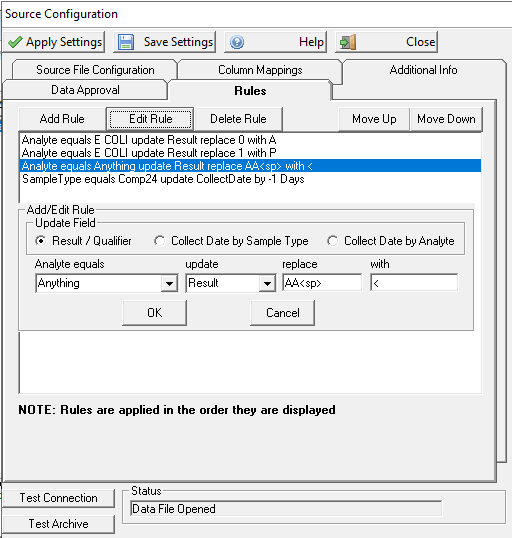
Notes:
- The addition of the Detection Limit and Reporting Limit Mapping adds a couple of new options for Rules.
- The Update field section adds the ability to create a rule that will adjust the Collection Date.
- This can be triggered by Sample Date or Analyte.
- Special Tags [DL], [RL] and [RESULT] can be used in the 'with' field.

For this rule, if Result = ND it will be replaced with <2.0 Where 2.0 is the value in the Detection Limit Column.

For this rule, if Result is less than the value in the Detection Limit Column, Result will be replaced with <2.0 where 2.0 is the value in the Detection Limit Column.

This rule can be defined by Sample Type or by Analyte. The Collection Date will be adjusted by the number of days or hours by the Offset Amount.

For this rule, if the Result is between the Detection Limit and the Reporting Limit, Result will be replaced by < the value of Reporting Limit.