|
|
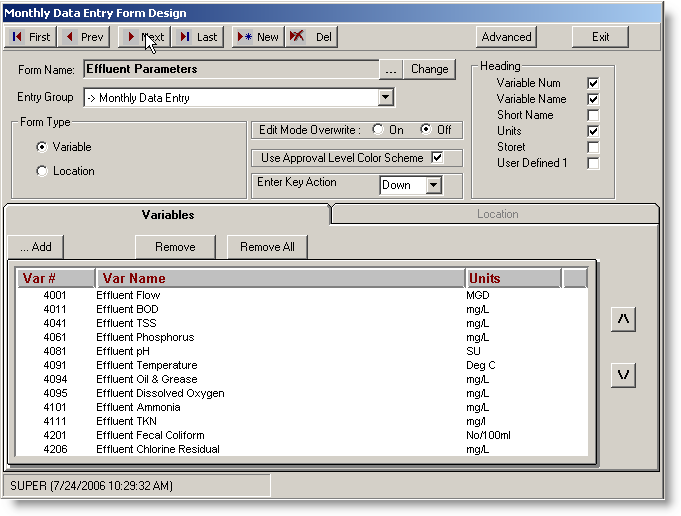
Monthly Data Entry Design allows you to add new, change existing, and delete Monthly Data Entry Forms. |
 |
Once a form is created, you will be able to access it from the Data Manager menu. Designing a Monthly Data Entry form is very simple. Select Design, Monthly Data Entry Forms. The form design screen will be displayed. If you have not designed any forms yet, the design screen will be empty allowing you to choose your variables, options, and form name for your first form. If there are existing forms, the first form will be displayed. Once in the design form you may choose the variables you wish to work with in any order you decide, and name your new form. You may either exit the design form by clicking the [Exit] button, or you may choose [New] to continue with the creation of another form (changes are automatically saved).

- Form Name
Displays the name selected Monthly Data Entry Form. The name is displayed in the Data Manager Menu and is used to select the form for use.

Click the Change button to edit the Form Name. The ... button allows you to select a form to design (instead of using Next, Prev buttons to move to the form).
- Entry Group
Sets the Entry Group for the Monthly Data Entry Form.
- Form Type
Select "Variable" in order to add any variables to the form.
Select "Location" in order to display all variables associated with a particular location.
- Edit Mode Overwrite
Select On to enable manual data entry to overwrite the current entry.
Select Off to disable manual data entry to overwrite the current entry.
- Use Approval Level Color Scheme
Check this box in order to display data in the colors corresponding to the Data Approval Setup table.
- Enter Key Action
Select Down or Across to determine the direction the cursor will move when the [Enter] key is pressed. When working in a Monthly Data Entry form, moving down will move you to the next day, same parameter. Moving across will move you to the next parameter, same day.
- Heading
Allows selection via checkboxes of what will appear for each variable that will appear in column header.
BUTTONS:
|