Form Name: Name of the form. Use the  button to edit the name of the form.
Print Options Tab
Margins: Increase or decrease print margins on the outside edges of the form by clicking the up and down arrows for the margin you want to adjust.
Orientation: Select the orientation for the report. Portrait is with the short sides of the page horizontal. In the Landscape position, the long sides are horizontal.
Paper Size: Choose which paper size the report will be printed on from the pulldown list.
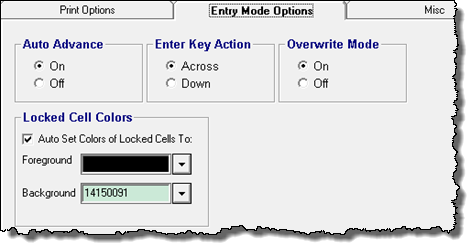
Entry Mode Options Tab

Auto Advance: When it's on, this feature causes the cell selector to advance to the next data entry cell. The next data entry cell is any cell with:
- A white background
- A light yellow background indicating the cell value is outside Entry Range for the variable.
- A light red background indicating the cell value is a daily violation.
- A background color listed on Facility Setup Colors Tab- Custom Data Entry Auto Advance Colors A light orange background indicating value is a daily violation and outside the entry range.
Each time the user presses the enter key. It will seek for the next entry cell below the current location if the Enter Key Action is set to "Down" and if the Enter Key Action is set to "Across" the data entry cell to the right will be found. This setting sets whether the form by default has Auto Advance on or off.
Enter Key Action: This default setting determines how the cell selector moves when the user presses the Enter key. The two settings are "Down" and "Across". This option sets the default for when the form is used for data entry. It may be toggled between "Down" and "Across" in data entry mode.
Overwrite Mode: This default setting determines the edit mode used as each cell is selected during data entry. If it is set to on, existing data in a cell is replaced as soon as the user begins typing a new value. When it is off, the user must double click to highlight existing data before it is replaced.
Locked Cell Colors: Used to specify whether to display locked cells in a specified color. Cells are locked when using a form (i.e. when the form is being used to enter data, not in design) for a variety of reasons:
- when they refer to a calculated variable
- when they contain a spread formula
- when the user does not have the rights to edit the data - Variable has it's data read-only flag set, outside the user's data approval settings, or the user type does not allow data to be edited (i.e. Entry or Read-Only users).
Check Auto Set Colors of Locked Cells To: and pick the colors for locked cells. If unchecked, the locked cells will be displayed in whatever color the user has specfied for that cell.
NOTE: Data that is locked by the Facility Lock Date will appear in a light blue background indicating they are locked and overrides this setting.
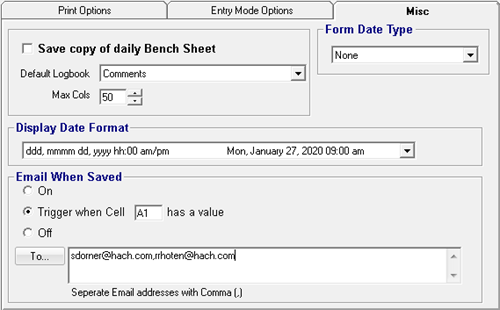
Misc Tab

Save Copy of Daily Bench Sheet: With this box checked, a bench sheet will be saved for each day. This feature allows the user to create custom bench sheets that do calculations on the bench sheet and store only the results in variables in the database. Raw data values will then be saved on that days bench sheet.
Whenever the result of a cell's formula done on a Custom Data Entry Form is to be stored in a variable, it is strongly recommended that this feature is used.
Default Logbook: Sets which logbook is set as the default when making logbook entries with the form.
Max Cols: Sets the number of columns in the form. NOTE: Rows cannot be increased.
Form Date Type: Specifies a date that will be loaded when using the form. Example, if set to Sunday - only a Sunday will be loaded. When using a form, if the user picks any other day of the week, the previous Sunday will be selected. This allows you to design forms that the start date of the form will be a certain day of the week, first day of the month, or last day of the month.
Display Date Format: Sets how the date/time is displayed for the current data slot. When entering data in Custom Date Entry the date/time for the data slot of the currently selected cell is displayed in the toolbar at the top of the screen. For daily detail variables, this option allows you to display the start time of the data slot, or the date/time range of the data slot. Examples show the settings, date display for V1 (Daily Variable), and V4 (4 hour variable) if the current date is Jan 27th at 1:40 PM.
| Setting |
V1 Daily Variable |
V4 - (4 hour Variable) |
| ddd, mmmm dd, yyyy hh:00 am/pm |
Mon, January 27 2020 |
Mon, January 27 2020 12:00 pm |
| No Display |
|
|
| mmm dd, yyyy hh:mm am/pm - hh:mm am/pm |
Jan 27, 2020 |
Jan 27, 2020 12:00 pm - 03:59 pm |
| Short Date hh:mm - hh:mm |
1/27/2020 |
1/27/2020 12:00 - 15:59 |
| Short Date hh:mm am/pm - hh:mm am/pm |
1/27/2020 |
1/27/2020 12:00 pm - 03:59 pm |
Email When Saved: An Excel Export (xls) can be emailed when the Form is saved.
- On: Any time the form data is saved (either thru the Save Button, changing date, exiting form...), the user will be prompted to Send the email to the recipients listed.
- Trigger When Cell ____ has a value: Any time the form is saved if the Cell listed has any value the user will be prompted to Send the email to the recipients listed. NOTE: This field can be calculated, therefore you can build logic that the form is complete or it has values outside the entry range, etc...
- Off: No email sent.