|
Used to design the electronic report for submission (upload) to California electronic Self Monitoring Report (eSMR). |
 |
The locate tool is used to design a spread report that will produce a CSV file, which will meet the California eSMR specifications. Users will then be able to login to the California eSMR system and use the import function to submit the data. The eSMR is an electronic version of the NPDES DMR printed report.
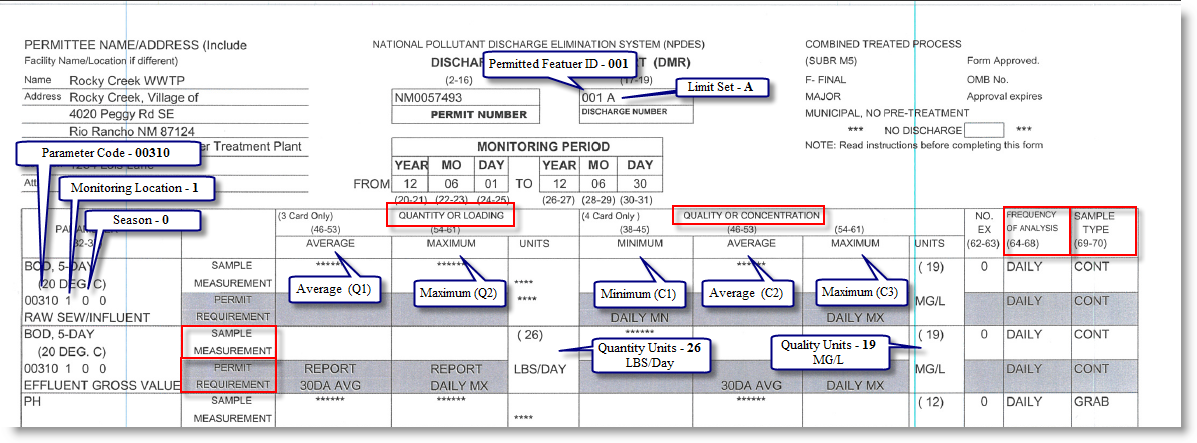
The paper NPDES DMR (Form 3020) below, can be used to help map your eSMR fields:
This is what you will see when designing the California eSMR in Hach WIMS:
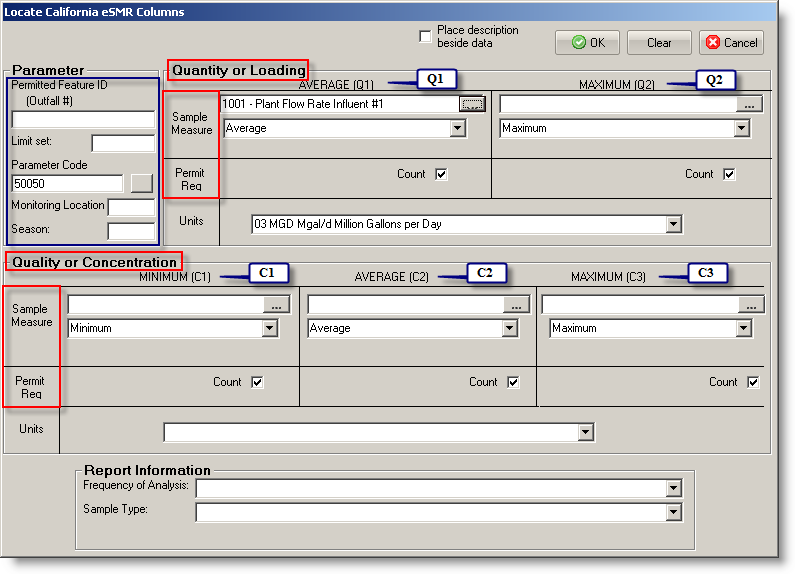
FIELDS:
Parameters
Permitted Feature ID - The identifier of the permitted unit, feature, or process.
Limit Set - The code for your limit (Permitted Feature ID and Limit Set make up the Discharge Number).
Parameter Code - Code of the sample (called Storet code in Hach WIMS and is automatically filled if the variable selected has been set up properly).
Monitoring Location - Location for this column
Season - Season for this report
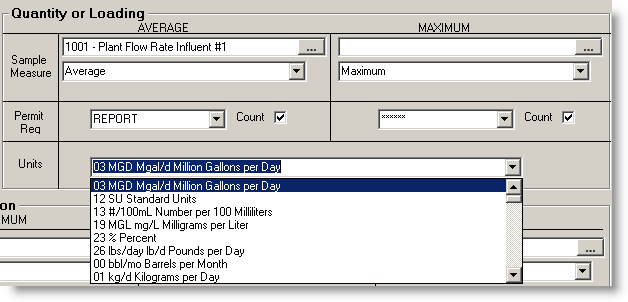
Quantity or Loading
AVERAGE (Q1) - Average amount of quantity/loading
MAXIMUM (Q2) - Maximum amount of quantity/loading
Sample Measure - Select the Hach WIMS variable, and what statistic to use to report the data. Note: Each statistic will default to what is the most common statistic to use. Example, for Quantity 1 (Q1 Average) and Concentration 2 (C2 Avg), it will default to Average Median (see Average and Geometric Mean reporting for California DMR), if the variable allows symbol and Average if it does not. Q2 Maximum or C3 Maximum defaults to Maximum.
Permit Req - Check whether to report the Count of violations/exceptions (if checked, the report will count violations)
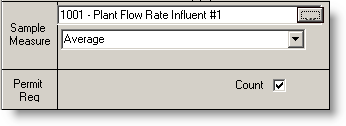
Units - Unit of Measure code for the quantity or loading columns. WIMS will default the Units based on the selected variable’s Units, or you can select from the pull down list. Note: The six most commonly used unit codes are at the top of the list followed by the rest in alpha-numeric order. (see EPA Unit of measurement code for a complete listing)
Quality or Concentration
Basically the same as above except you have MINIMUM (C1), AVERAGE (C2), and/or MAXIMUM (C3) fields.
Report Information
Frequency of Analysis - How often are samples taken, in our example we chose 02/02 Twice Per Week - notice there is a distinction between this and 02/07 Twice Every Week

Sample Type - This is the type of sample taken, in our example we do a grab so select GR for Grab

Fill out the form, and click OK. Below is an example of the report created. You can add more columns as needed, each column creates a new row in the eSMR CSV file.
Note: Use your existing NPDES DMR as a guide.
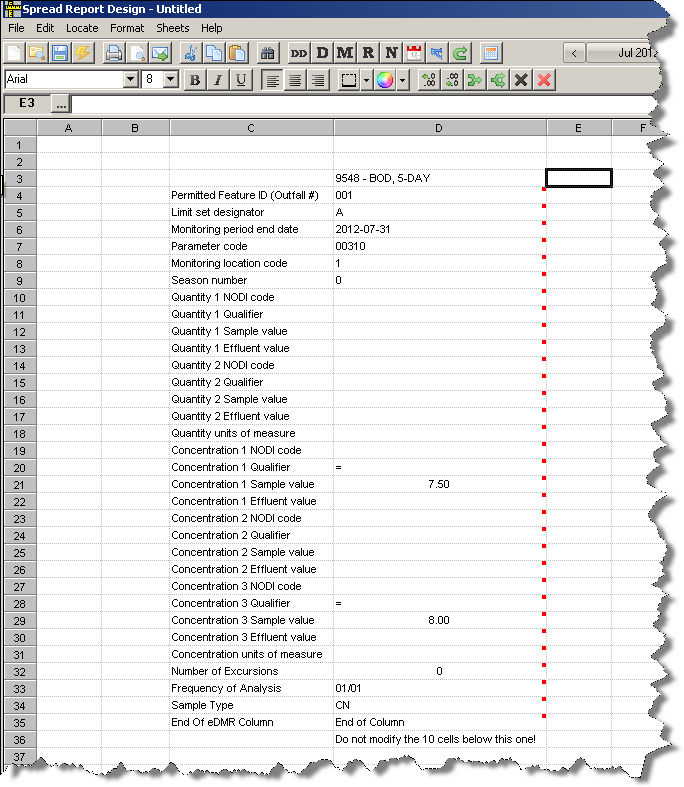
Make a column for each Parameter from your NPDES DMR, save the report and use Report Pac > Spread Reports to produce your eSMR CSV file for upload.
The name of your report is entered by the user and may vary with your installation, see the following image.
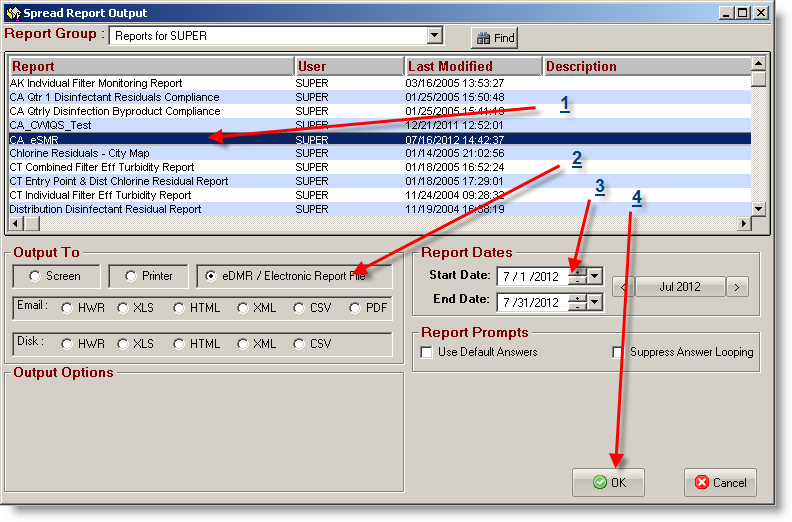
- Select the report you want to generate
- Select eDMR / Electronic Report File
- Enter the Report Dates
- Click OK
This will generate a CSV File ready for upload:

The header line required in the California eSMR is (must be one straight line without spaces or returns in the CSV text file):
permitted_feature_id,limit_set_txt,mped_txt,parameter_cd,monitor_location_cd,season_num,quant_1_nodi_cd,quant_1_qualifier_txt,quant_1_sample_num,
quant_1_effluent_num,quant_2_nodi_cd,quant_2_qualifier_txt,quant_2_sample_num,quant_2_effluent_num,quant_uom_cd,conc_1_nodi_cd,conc_1_qualifier_txt,
conc_1_sample_num,conc_1_effluent_num,conc_2_nodi_cd,conc_2_qualifier_txt,conc_2_sample_num,conc_2_effluent_num,conc_3_nodi_cd,conc_3_qualifier_txt,
conc_3_sample_num,conc_3_effluent_num,conc_uom_cd,excursions_num,freq_analysis_cd,sample_type_cd
The complete file specification can be found at:
http://www.waterboards.ca.gov/water_issues/programs/ciwqs/docs/dmr_upload_format.xls
It will have the valid codes for Parameter, NODI, Unit of Measure, Frequency of Analysis, and Sample Type.
See dmr_instructions.pdf (State Water Resources Control Board's manual for completing Pre-Printed DMRs for notes on calculations and handling of data qualifiers).
NOTES for NODI Codes:
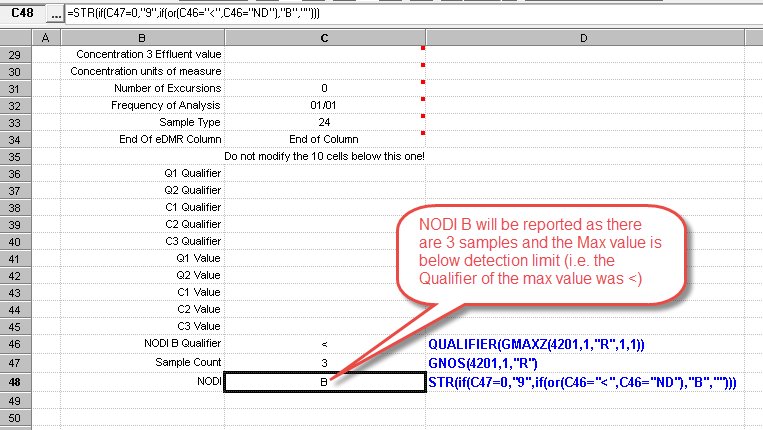
The Locate tool supports two No Data Indicator (NODI) code options. Please review logic to verify it pertains to your specific situation.
NODI B - Below Detection Level. If ALL data points for a given parameter/monitoring period are below the MDL (Method Detection Limit), report a NODI code of B.
NODI 9 - Conditional Monitoring: Not Required this period. If there are no values for the selected parameter, it is ASSUMED that it is a NODI 9.
